Archive
Configuring Site-to-Site VPN with Forefront TMG and Cisco PIX and ASA
Forefront Threat Management Gateway (TMG) 2010 supports several protocols for establishing a site-to-site (LAN to LAN) VPN, including PPTP, L2TP, and IPsec. Of these, IPsec is the only supported protocol for establishing site-to-site VPN connections with third-party VPN devices such as Cisco PIX and ASA. In this post I will demonstrate how to configure Forefront TMG and the Cisco PIX/ASA to create a site-to-site VPN for the following branch office deployment scenario:
[Note: Site-to-site VPN in TMG is supported only in multi-homed network configurations. The TMG firewall must be configured with a minimum of two network interfaces to function as a site-to-site VPN gateway.]
Configuring the TMG Firewall
Open the TMG management console and highlight the Remote Access Policy (VPN) node in the navigation tree, then select the Remote Sites tab in the main window. In the Tasks pane on the right side, click Create VPN Site-to-Site Connection.

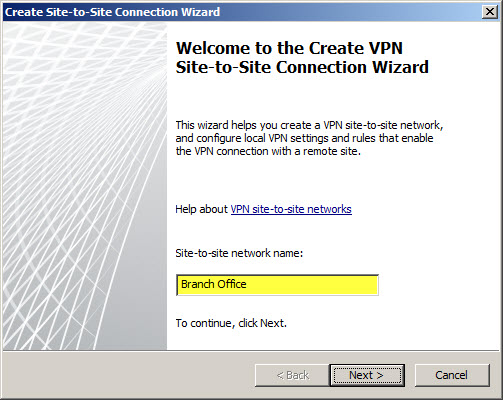
The Site-to-Site Connection Wizard will collect the necessary information to establish the VPN tunnel. Enter a descriptive name when prompted.
Select IP Security protocol (IPsec) tunnel mode.

If the TMG firewall is a member of an array that does not have Network Load Balancing (NLB) enabled, select a node to be the connection owner. If NLB is enabled, the connection owner is assigned automatically. [Note: When configuring a site-to-site VPN connection on a TMG firewall that is a member of an array and NLB is not enabled, hosts that are accessed via the tunnel must be configured with a default gateway or static route that will direct traffic back to the array member chosen as the connection owner.]

Enter the IP addresses of the remote and local VPN gateways. The remote VPN gateway IP address will be the IP address assigned to the outside network interface on the Cisco PIX/ASA firewall. The local VPN gateway IP address will be the IP address assigned to the External network interface on the TMG firewall. If the TMG firewall is part of an NLB-enabled array, specify the Virtual IP (VIP) address assigned to the External network of the array.

Certificates are the most secure and preferred method for authenticating tunnel endpoints, but because they are more complex and difficult to configure, many security administrators opt instead to use pre-shared keys. When choosing a key, be sure it is very long and complex (up to 128 characters – it is a good idea to use a random password generator for this task). Although using special characters is an excellent idea for complex keys, avoid using the question mark as the PIX and ASA object to this.

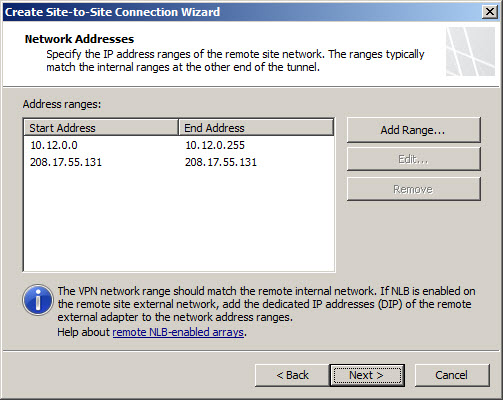
Add the address range(s) of the remote site network(s). It is recommended that these addresses be configured along subnet boundaries.
A network relationship needs to be established between the Internal network and the remote site network. The wizard automatically establishes a route relationship between these two networks.

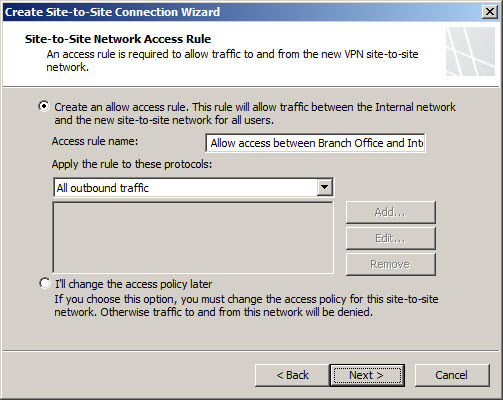
An access rule is required to allow communication between the Internal network and the remote site network. If this is a fully trusted remote network (e.g. branch office), select all outbound traffic. If the remote network is untrusted (e.g. business partner), specify which protocols and ports are allowed.
Review the configuration and select Finish.

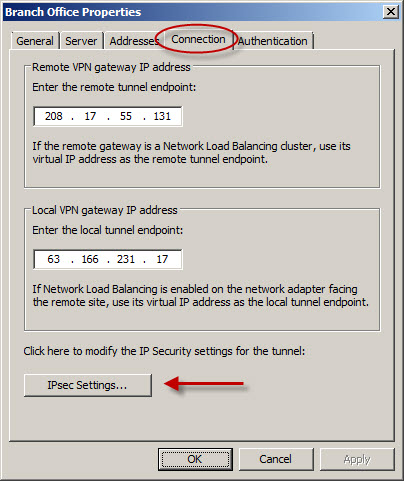
Do not apply the configuration now. The default encryption settings chosen by TMG are incompatible with the Cisco PIX and ASA. To change these settings to match the settings on the PIX/ASA, right-click the remote site and choose properties. Choose the Connection tab and then click IPsec Settings.
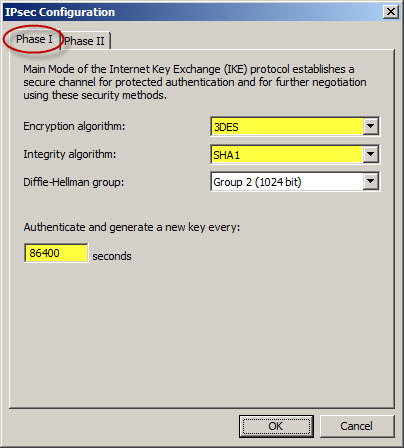
For the Phase I settings, change the Encryption algorithm to 3DES, the Integrity algorithm to SHA1, and the Authenticate and generate a new key every: to 86400 seconds (24 hours).
For the Phase II settings, change the Encryption algorithm to 3DES and the Integrity algorithm to SHA1. Change the Session key settings so that a new key is generated every 4608000 Kbytes or 28800 seconds (8 hours).
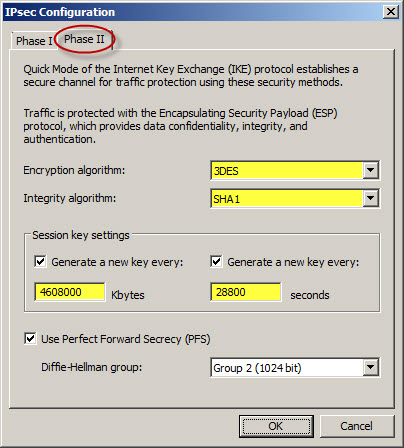
Once complete, save and apply the changes.
Configuring the Cisco ASA 7.x
Connect to the ASA with administrative privileges and enter enable mode. To configure the management connection (phase 1) parameters, establish an ISAKMP policy and set the parameters to use a pre-shared key, use 3DES/SHA for encryption and integrity, specify the use of Diffie-Hellman group 2 (1024-bit) and authenticate and generate a new key every 86400 seconds (24 hours).
crypto isakmp policy 10
authentication pre-share
encryption 3des
hash sha
group 2
lifetime 86400
crypto isakmp enable outside
Configure a tunnel-group for the remote peer and establish authentication using a pre-shared key.
tunnel-group 63.166.231.17 type ipsec-l2l
tunnel-group 63.166.231.17 ipsec-attributes
pre-shared-key mMWsT0umh_UQmh]yevjNBW_F
For the data connection (phase 2) create an access rule that defines which traffic to protect using this tunnel. In this example, create an access rule that defines all IP traffic going from 10.12.0.0/24 to 172.16.1.0/24.
access-list branch_office extended permit ip 10.12.0.0 255.255.255.0 172.16.1.0 255.255.255.0
Create a NAT rule to exempt any traffic matching this access rule from NAT.
nat (inside) 0 access-list branch_office
Define which encryption algorithms will be used to protect this traffic. In this example specify the use of 3DES and SHA1.
crypto ipsec transform-set branch_office esp-3des esp-sha-hmac
Build the crypto map, indicating that any traffic that matches the branch_office ACL is sent to the specified remote peer using the encryption algorithm defined in the brach_office transform set with Perfect Forward Secrecy (PFS) enabled using Diffie-Hellman Group 2.
crypto map branch_office_map 1 match address branch_office
crypto map branch_office_map 1 set pfs group2
crypto map branch_office_map 1 set peer 63.166.231.17
crypto map branch_office_map 1 set transform-set branch_office
Activate the crypto map on the ASA’s outside interface.
crypto map branch_office_map interface outside
Configuring the Cisco PIX 6.x
Creating a site-to-site VPN connection on a Cisco PIX is similar but slightly different than configuring an ASA. For example, when configuring the management connection (phase 1) parameters using the same configuration used previously, use the following commands:
crypto isakmp policy 10 authen pre-share
crypto isakmp policy 10 encrypt 3des
crypto isakmp policy 10 hash sha
crypto isakmp policy 10 group 2
crypto isakmp policy 10 lifetime 86400
crypto isakmp key mMWsT0umh_UQmh]yevjNBW_F address 63.166.231.17 netmask 255.255.255.255
crypto isakmp enable outside
Create the access rule defining which traffic to protect using this tunnel.
access-list branch_office permit ip 10.12.0.0 255.255.255.0 172.16.1.0 255.255.255.0
Exempt this traffic from NAT.
nat (inside) 0 access-list branch_office
Protect this traffic using 3DES and SHA1.
crypto ipsec transform-set branch_office esp-3des esp-sha-hmac
Build the crypto map.
crypto map branch_office_map 1 ipsec-isakmp
crypto map branch_office_map 1 match address branch_office
crypto map branch_office_map 1 set peer 63.166.231.17
crypto map branch_office_map 1 set transform-set branch_office
crypto map branch_office_map 1 set pfs group2
Activate the crypto map on the PIX outside interface.
crypto map branch_office_map interface outside
Unlike the ASA, the PIX requires an access rule to allow tunneled traffic to cross the firewall. For the branch office scenario (fully trusted network), allow all IP traffic from the 172.16.1.0/24 network to reach the 10.12.0.0/24 network and assign that access rule to the outside interface.
access-list main_office_in permit ip 172.16.1.0 255.255.255.0 10.12.0.0 255.255.255.0
access-group main_office_in in interface outside
Due to formatting issues, some of the text in the PIX and ASA command examples may be truncated. You can download the script files for these examples here: PIX | ASA.
HTTP to HTTPS Redirection Options in Forefront TMG and UAG
When publishing SSL-protected web sites such as Microsoft Outlook Web App with Forefront Threat Management Gateway (TMG) 2010 or Unified Access Gateway (UAG) 2010, it is often desirable to allow clients to enter the URL of the site without specifying the HTTPS protocol explicitly. For example, when publishing Outlook Web App (OWA) 2010 where the full URL is https://mail.celestix.net/owa/, for convenience an administrator might want to redirect non-secure requests for http://mail.celestix.net/owa/ to use the secure HTTPS protocol automatically. This can be done in a number of ways, depending on which Forefront solution is used for publishing.
Forefront TMG
With TMG, HTTPS redirection can be enabled by opening the properties of the web listener used in the publishing rule and selecting Enable HTTPS connections on port: and Redirect authenticated traffic from HTTP to HTTPS.
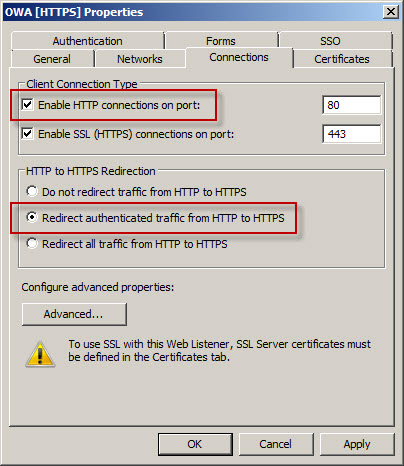
Now when users request the non-secure http://mail.celestix.net/owa/ they will automatically be redirected to the secure https://mail.celestix.net/owa/.
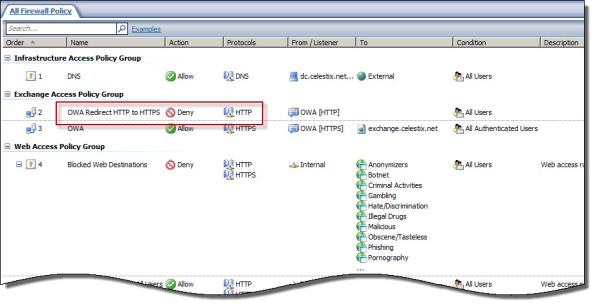
Even more convenient is to redirect requests for the base URL http://mail.celestix.net/ to the correct path https://mail.celestix.net/owa/. The easiest way to accomplish this is to create a new publishing rule that denies requests to http://mail.celestix.net/ and redirects them to https://mail.celestix.net/owa/. To enable this functionality, use the Web Site Publishing Wizard to create a publishing rule that denies access to http://mail.celesitx.net/ and redirects those requests to https://mail.celestix.net/owa/.

Be sure to place this rule before the publishing rule allowing access to the SSL-protected web site.
Now when users request the non-secure http://mail.celestix.net/ they will automatically be redirected to the secure https://mail.celestix.net/owa/.
Forefront UAG
Configuring Forefront UAG to redirect HTTP to HTTPS is even simpler. After you’ve created a trunk and published OWA, right-click HTTP Connections in the UAG management console navigation tree, select New Trunk, and then select the HTTP to HTTPS redirection option.


