Archive
Publish DirectAccess with Forefront TMG 2010
DirectAccess is a compelling remote access solution that provides seamless and transparent, always-on, bi-directional remote corporate network connectivity for managed Windows clients. In Windows Server 2008 R2 and Forefront Unified Access Gateway (UAG) 2010, the DirectAccess server had to be configured with two network adapters, with the external network interface configured with two consecutive public IPv4 addresses. Many security engineers were understandably concerned about exposing a domain-joined Windows server directly to the public Internet, which limited the adoption of the technology. Beginning with Windows Server 2012, DirectAccess is integrated in to the operating system and provides more flexible network configuration. DirectAccess can now be deployed behind an existing edge security solution performing NAT, and even supports single-NIC configuration.
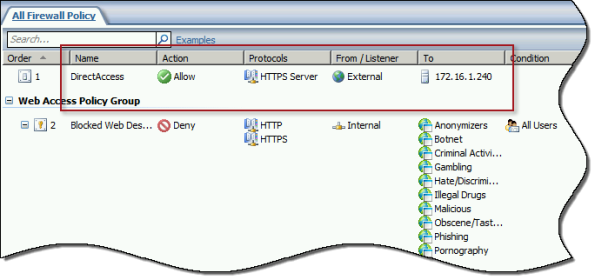
The Forefront TMG 2010 firewall is an excellent choice to provide essential protection for the DirectAccess workload. When DirectAccess is deployed behind a NAT device, the only firewall port that needs to be opened is TCP port 443 (HTTPS).
When publishing DirectAccess with TMG, it is important to use a server publishing rule and not a web publishing rule. To publish DirectAccess, open the Forefront TMG 2010 management console, right-click Firewall Policy in the navigation tree, and then choose New Non-Web Server Publishing Rule.
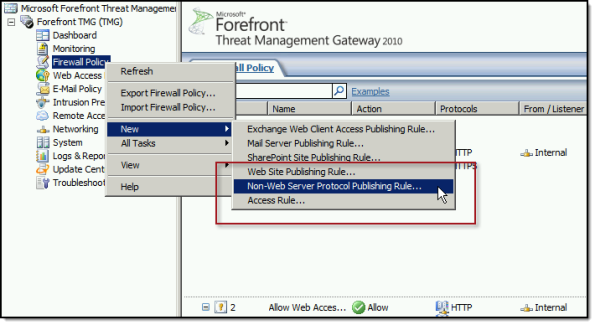
Provide a descriptive name for the rule, enter the IP address of the DirectAccess server, choose HTTPS Server for the protocol, and then select the network interface on which to listen for these requests.
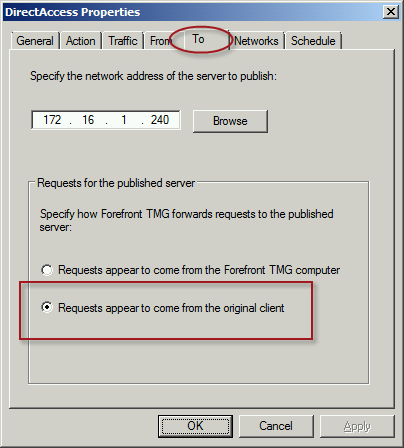
To ensure the proper operation of Receive Side Scaling (RSS) on the DirectAccess server, it is recommended that the server be configured to use TMG as its default gateway and to configure the publishing rule on TMG using the option Requests appear to come from the original client.
Also, TMG does not support load balancing for server publishing rules, so it is not possible to deliver traffic to multiple back end servers using TMG. For high availability and to provide for scalability, it is recommended to configure load balancing for DirectAccess using NLB or an external load balancer (recommended) and publish the virtual IP address (VIP) using the steps described above.
To learn more about DirectAccess, visit http://directaccess.richardhicks.com/
Forefront TMG 2010 Computer Certificate Request or Renewal Fails
When attempting to request or renew a computer certificate on the Forefront TMG 2010 firewall, you may receive the following error message:
Status: Failed
The RPC server is unavailable.

This occurs because the Forefront TMG 2010 firewall does not, by default, allow the protocols and ports required to request or renew a certificate from a Certificate Authority (CA). Common workarounds suggest stopping the firewall completely or creating a rule allowing all protocols and ports from the TMG firewall to the CA. However, both of these workarounds are problematic. Stopping the firewall is a manual process that will cause a service disruption. It also leaves the firewall in an unprotected state. For edge deployment scenarios, the underlying operating system will be exposed directly to untrusted networks, which is a serious security risk. Creating an open access rule is not desirable because it violates the basic security principle of least privilege by allowing more access than is required.
To properly address this issue and allow for the secure request and renewal of certificates without disruption and with the least exposure, it will be necessary to create an access rule on the Forefront TMG 2010 firewall to allow all dynamic ports (TCP 49152-65535) from the local host network to the IP address of the CA for all users.

Note: Allowing all dynamic ports (TCP 49152-65535) might also be considered too much access from the Forefront TMG 2010 firewall to the CA. It is possible to restrict the dynamic ports used by TMG and further tighten the access rule, if required. For information about restricting dynamic ports, click here.
In addition to the access rule allowing all dynamic ports, it will also be necessary to make a change to a system policy rule. To do this, right-click the Firewall Policy node in the navigation tree and choose All Tasks, System Policy, and then Edit System Policy. In the Authentication Services group highlight Active Directory and clear the checkbox next to Enforce strict RPC compliance.

Once these changes have been made you can now request or renew a computer certificate on the Forefront TMG 2010 firewall successfully.

Extending the Life of Forefront TMG 2010 with Zscaler Cloud Based Security
Forefront TMG End of Life
With the end of life announcement for Microsoft Forefront TMG 2010, one of the most common questions I am asked is “What should I replace my Forefront TMG firewall with?” Many are surprised when I reply “Why do you want to replace it?” Simply because Forefront TMG will not be developed in the future does not mean there’s an immediate need to replace it. Considering the fact that Forefront TMG mainstream support extends until April 2015, and extended support lasts until April 2020, often the decision to replace TMG is nothing more than a knee-jerk reaction to marketing pressure by vendors of competing solutions.
Do You Need to Replace Forefront TMG 2010 Now?
If you have deployed Forefront TMG 2010 as a firewall, basic forward or reverse web proxy, or remote access or site-to-site VPN, there is no need to replace Forefront TMG 2010 right now. All of the features used in these deployment scenarios will continue to function in to perpetuity. You have until April 2020 to find a replacement for Forefront TMG, which should give you plenty of time to consider alternative solutions. However, if you have deployed Forefront TMG as a secure web gateway, the situation is a little different. Although support for the product extends until April 2020, the Web Protection Service (WPS) subscription will only function until the end of 2015. This means that URL filtering reputation database updates, antimalware signatures, and Network Inspection System (NIS) signatures will no longer be updated past this time. Not to worry, there are some excellent cloud-based security solutions that can be integrated with Forefront TMG 2010 to effectively extend the life of TMG for the foreseeable future.
Extending the Life of Forefront TMG 2010 with Zscaler
Recently I had the opportunity to evaluate the Zscaler Cloud-based security solution. Zscaler provides security-as-a-service and integrates seamlessly with Forefront TMG to provide essential web security protection with URL filtering, dynamic web content control, virus and malicious software scanning, HTTPS inspection capabilities, and more. The Zscaler security solution provides significantly more protection than the native Forefront TMG technologies offer. There are also tremendous economies of scale to be gained by using this cloud-based security solution, as Zscaler has more than 4000 enterprise customers in 180 countries, servicing more than 10 million users globally. The threat intelligence gained from having such a broad view of Internet activity worldwide enables Zscaler to quickly identify emerging threats on a global basis and extend protection to all of its customers quickly and effectively.
Zscaler Integration with Forefront TMG 2010
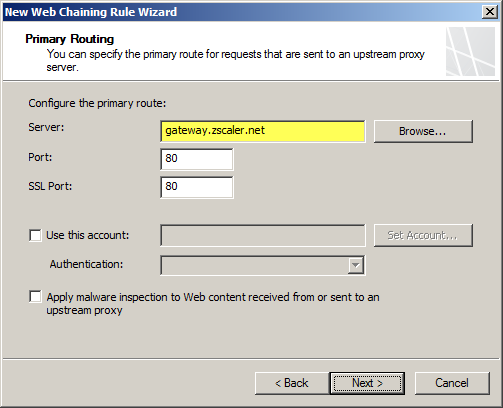
Integrating an on-premises Forefront TMG firewall with the Zscaler cloud is accomplished without having to install a plug-in on the TMG firewall. On-premises web traffic is delivered to the Zscaler cloud service by Forefront TMG through the use of web proxy chaining rules. After you’ve signed up for the service, simply configure a web proxy chaining rule to forward web proxy requests from Forefront TMG to the Zscaler cloud proxy gateways.

Zscaler Protection for Mobile Users
The Zscaler solution has some additional advantages over Forefront TMG’s native web protection mechanisms. With a cloud-based solution, Zscaler’s protection can also be extended transparently to mobile users, keeping them safe regardless of where they are. Zscaler has more than 100 datacenters worldwide, ensuring quick response times and low latency wherever the mobile user happens to be. Integrating individual clients can be done using proxy PAC files to route traffic to Zscaler’s datacenters. Additionally there is an option to install an agent on the client to forward traffic, which has the benefit of preventing the end user from disabling proxy settings to bypass content filtering restrictions.
Forefront TMG 2010 and Zscaler – Better Together
You may be asking yourself “Why not just use Zscaler exclusively? Why do I need TMG at all?” Valid question! Integrating Zscaler with Forefront TMG provides the best of both worlds in terms of security and performance. With Forefront TMG 2010 on premises, you have a Common Criteria-certified enterprise-class firewall to provide the highest level of security for your network. You can leverage strong user and group-based authentication, and you gain the added benefit of local caching for web content. In addition, you can make use of Forefront TMG 2010’s other features like multi-networking to create perimeter or DMZ networks for isolating public-facing services, reverse proxy for on-premises web-based and non-web based applications and services, remote access VPN for managed and non-managed mobile users, and site-to-site VPN to connect remote offices, business partners, or cloud service providers.
Forefront TMG End of Sale? Not Quite!
Although Microsoft is committed to supporting Forefront TMG 2010 for many years to come, they are no longer selling Forefront TMG 2010 licenses or the Web Protection Service (WPS) subscription licenses. If you’ve already deployed Forefront TMG 2010, or have already purchased Forefront TMG processor licenses and the WPS subscription, you have nothing to worry about. If you’re looking to deploy Forefront TMG 2010 today, you can’t purchase licenses for the software from Microsoft. However, you can still obtain Forefront TMG 2010 through a Microsoft OEM partner like Celestix Networks. (Full disclosure: Celestix Networks is my current employer.)
Keep Calm and Carry On
In my estimation, you can safely deploy or keep Forefront TMG 2010 in your environment and still gain a healthy return on your investment for many years to come. If you’re using Forefront TMG for publishing services such as Outlook Web App (OWA) or SharePoint, or you’re leveraging client-based remote access or site-to-site VPN, you have nothing to worry about. If you’re using Forefront TMG as a secure web gateway, you can enhance and extend the solution by using Zscaler’s cloud-based security solution for less than you would have paid for the Microsoft WPS subscription. No need to go out and replace your Forefront TMG 2010 solution for quite a few more years! If you are considering a new deployment, you can still purchase Forefront TMG 2010 from Microsoft OEM partners like Iron Networks. So Keep Calm and Deploy Forefront TMG 2010 today!
Enable Hybrid Cloud with Forefront TMG 2010 and Windows Azure
Earlier this year I published an article on ISAserver.org on how to enable cross-premises network connectivity to Windows Azure using Forefront TMG 2010. When I wrote that piece, Windows Azure virtual networking was still in preview (beta). Since that time, Windows Azure virtual networking has been officially released, with some significant changes in features, functionality, and configuration steps. Many people noticed that their existing Forefront TMG 2010 to Windows Azure site-to-site VPN stopped working at this time and assumed that support for TMG had been dropped. Not so! Forefront TMG 2010 site-to-site VPN does work with Windows Azure virtual networks, and is indeed supported as it meets the minimum requirements for VPN devices connecting to Windows Azure virtual networks outlined here.
Configuring site-to-site VPN connectivity between the Forefront TMG 2010 firewall and Windows Azure virtual networks is not without a minor drawback, however. One of the new features of Windows Azure virtual networking is point-to-site VPN using SSTP. Unfortunately this feature requires that you configure dynamic routing on your Windows Azure virtual network, and dynamic routing makes use of IKEv2, which the Forefront TMG 2010 firewall does not support. So, if you want to enable cross-premises network connectivity to Windows Azure using Forefront TMG 2010, you will not be able to take advantage of this new point-to-site VPN connectivity option.
Important Note: Windows Azure virtual networking site-to-site VPN requires that your VPN endpoint have a public IPv4 address assigned to it’s external network interface. If your Forefront TMG 2010 firewall is located behind a border router or edge firewall performing NAT, site-to-site VPN connectivity with Windows Azure will not be possible.
To configure cross-premises network connectivity with Windows Azure, log in to the Windows Azure portal and select Networks in the navigation pane, then click on Create Virtual Network. Enter a Name for the virtual network, specify a Region, and provide an Affinity Group Name and select the appropriate Subscription.

Enter the names and IP addresses of any DNS servers to be used by machines in this virtual network and select the option to Configure site-to-site VPN. Do NOT select the option to Configure point-to-site VPN.

Provide a name for the site-to-site connection and enter the IP address assigned to the external network interface of the Forefront TMG firewall. In addition, specify the network address space in use on the private, on-premises side of the connection.

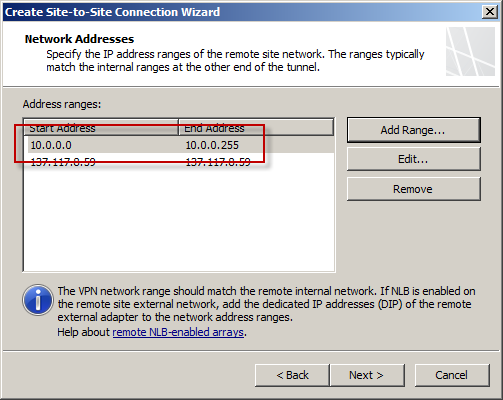
Define your virtual network subnet as required. Here I’ve chosen to use the 10.0.0.0/24 address space. Define any additional subnets as necessary and then click Add gateway subnet.


Click on the newly created virtual network and then click on Dashboard. Click Create Gateway and choose Static Routing.

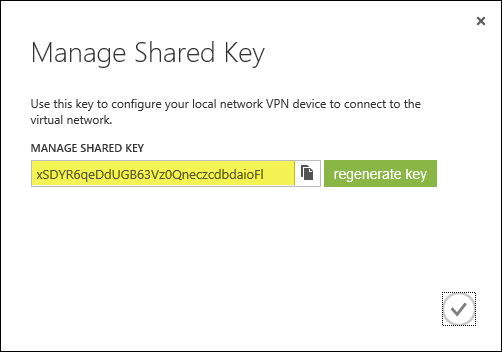
Once the gateway has been created, make a note of the Gateway IP Address and then click Manage Key. Copy this key as it will be required when configuring the site-to-site VPN on the Forefront TMG 2010 firewall.

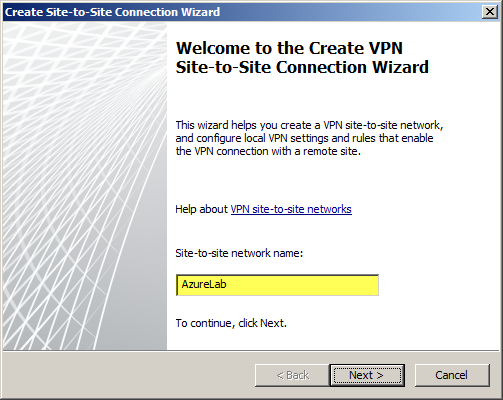
On the Forefront TMG 2010 firewall, open the management console and select Remote Access Policy (VPN). Click the Remote Sites tab in the center pane and then click Create VPN Site-to-Site Connection in the Tasks pane. When the Create Site-to-Site Connection Wizard begins, enter a name for the new site-to-site network.
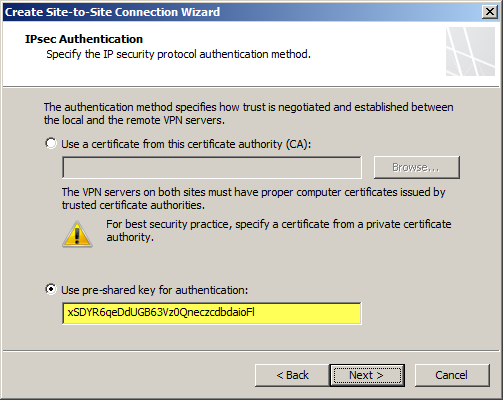
Select IP Security protocol (IPsec) tunnel mode.

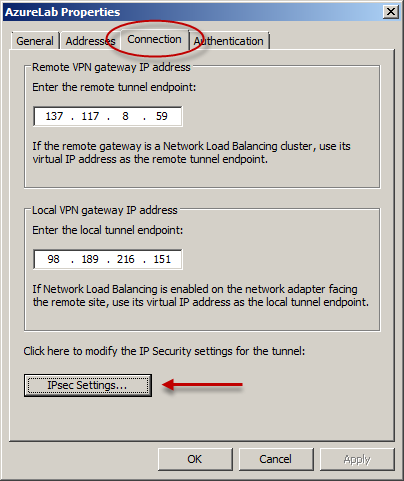
Enter the IP address of the Windows Azure virtual network gateway and the local VPN gateway IP address, which is the IP address assigned to the external network interface of the Forefront TMG 2010 firewall.

Copy the pre-shared key from the Windows Azure virtual network gateway.
The IP address of the Windows Azure virtual network gateway will be automatically added to the network address list. Click Add Range and add the IP address range you defined earlier for the virtual network.
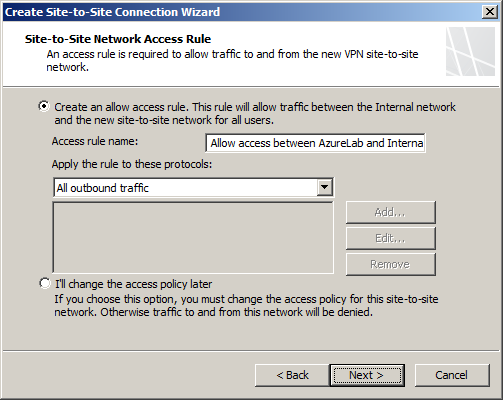
Select the option Create a network rule specifying a route relationship.

Any communication between the on-premises network and the Windows Azure virtual network must be allowed by firewall policy. You can create an access rule now, or create one later.
Review the configuration settings and click Finish.

Before applying the configuration, right-click the site-to-site connection and choose Properties, select the Connection tab, and then click IPsec Settings.
On the Phase I tab select SHA1 for the Integrity algorithm and leave the remaining settings at their defaults.

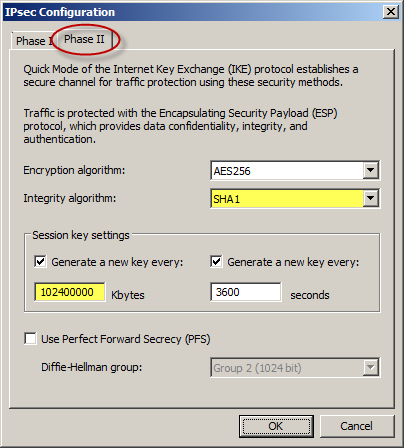
On the Phase II tab select SHA1 for the Integrity Algorithm. Select the option to Generate a new key every 102400000 Kbytes and clear the option to Use Perfect Forward Secrecy (PFS).
Once complete, apply the configuration. Finally, set the Maximum Transmission Unit (MTU) on the Forefront TMG 2010 firewall’s external interface to 1350 bytes by opening an elevated command prompt and issuing the following command:
netsh interface ipv4 set interface <interface_name_or_index> mtu=1350
For example:
netsh interface ipv4 set interface external mtu=1350
The Windows Azure management console should now indicate that you have successfully established a site-to-site VPN to the remote virtual network.

When you configure a new Windows Azure virtual machine, you can specify that the machine be placed in to your virtual network.

The new virtual machine should now be reachable from your on-premises network using the site-to-site VPN configured on the Forefront TMG 2010 firewall.
DirectAccess Session at Microsoft TechEd 2013
This month I had the honor and privilege to present a Windows Server 2012 DirectAccess session at Microsoft TechEd North America and Europe 2013. For those of you who attended in person, thank you very much! I certainly hope that you found the session informative and worthwhile. For those of you who were not able to attend in person, you can watch a recording of the session for free at Microsoft’s MSDN Channel 9 web site here. Enjoy!
Windows Server 2012 DirectAccess Video Training Course Now Available
Recently I announced the availability of my Windows Server 2012 DirectAccess video training course at TrainSignal. Click here to read the full story!
Forefront TMG 2010 Protocols and Ports Reference
When deploying Forefront TMG 2010 as a forward or reverse proxy, many organizations will place their TMG firewalls in a perimeter or DMZ network to provide an additional layer of protection for their proxies. When deployed in this manner, configuring perimeter firewalls to allow proper communication to and from the Forefront TMG firewall can be challenging. Although the Service Overview and Network Port Requirements for Windows document on TechNet includes information about ISA server (which also applies to TMG) it includes all protocols and ports used by TMG in all deployment scenarios. This can be confusing when you simply want to allow TMG firewalls in a perimeter network to communicate with an Enterprise Management Server (EMS) on the internal network, or simply manage a TMG firewall in a perimeter network from a management workstation on the internal network. Opening all of the ports listed in the Microsoft KB article mentioned above would be unnecessary and would violate the principle of least privilege, which dictates that only the specific ports required for communication should be opened.
Note: This reference covers typical TMG configurations and may not include all protocols and ports required for every deployment scenario. For example, if you are using RADIUS or RSA for authentication, have configured connectivity verifiers or a remote SQL server, or have deployed Forefront TMG 2010 for Exchange integration, each of these configurations will require additional perimeter firewall access. Also, don’t forget that your perimeter firewalls will need to allow access to the protocols and ports required for the services you are accessing/publishing through Forefront TMG 2010.
For reference, here are the protocols and ports required for specific, common Forefront TMG 2010 deployment scenarios:
EMS to TMG
TCP 135, 10000-65535* – RPC
TCP 3847 – MS Firewall Control
TMG to EMS
TCP 445 – CIFS
UDP 445 – CIFS
TCP 2171 – MS Firewall Storage (domain-joined only)
TCP 2172 – MS Firewall Storage Secure (workgroup mode only)
TCP 3847 – MS Firewall Control
TMG to DCs
Domain joined…
TCP 88 – Kerberos
UDP 88 – Kerberos (send receive)
UDP 123 – NTP
TCP 135, 49152-65535* – RPC
TCP 389 – LDAP
UDP 389 – LDAP
TCP 445 – CIFS
UDP 445 – CIFS
TCP 3268 – LDAP Global Catalog
Non domain-joined…
TCP 389 – LDAP (required only for pre-authentication in reverse proxy scenarios)
TCP 636 – LDAPS (required only for pre-authentication in reverse proxy scenarios)
TMG to DNS
TCP 53 – DNS (send receive)
UDP 53 – DNS
Primary EMS to Replica EMS
TCP 135, 49152-65535* – RPC
TCP 2173 – MS Firewall Storage Replication
Replica EMS to Primary EMS
TCP 135, 49152-65535* – RPC
TCP 445 – CIFS
UDP 445 – CIFS
TCP 2171 – MS Firewall Storage – domain-joined only
TCP 2172 – MS Firewall Storage (Secure) – workgroup mode only
TCP 3847 – MS Firewall Control
Web Proxy Client to TMG
TCP 80 – HTTP (WPAD only)
TCP 8080 – HTTP Proxy
Firewall Client to TMG
TCP 80 – HTTP (WPAD only)
TCP 1745 – Firewall Client Control Channel
UDP 1745 – Firewall Client Control Channel
TCP 1024-65535 – All high ports**
UDP 1024-65535 – All high ports**
Management Workstation to TMG
TCP 135, 10000-65535* – RPC
TCP 2171 – MS Firewall Storage – Domain mode only
TCP 2172 – MS Firewall Storage (Secure) – Workgroup mode only
TCP 3847 – MS Firewall Control
*The default dynamic port range for Windows Server 2008 R2 is 49152-65535. When TMG is installed this setting is changed to 10000-65535. This does not apply to TMG EMS, however. RPC can be configured to use a smaller range of dynamic ports, if necessary. For more information, please see Microsoft KB 154956.
**The Forefront TMG 2010 Firewall Client is designed to operate without a firewall between itself and the TMG firewall. It is highly recommended that you avoid this design whenever possible. If this is unavoidable, all TCP and UDP high ports will have to be opened, as the TMG Firewall Client control channel utilizes random high ports and cannot be restricted as RPC can.
Addressing Security Issues with PPTP VPN in Forefront TMG 2010
At the recent DEFCON hacking conference, security researchers demonstrated a method to crack the MS-CHAPv2 authentication protocol with a 100% success rate. MS-CHAPv2 is used as the default authentication method for remote access VPN in Forefront TMG 2010.

With the public availability of tools to automate the cracking process, PPTP communication using MS-CHAPv2 should be considered unencrypted. There are two options available to mitigate this concern: disable MS-CHAPv2 and enable EAP with PPTP, or disable PPTP and switch to a more secure remote access VPN protocol such as L2TP/IPsec or SSTP. Enabling EAP requires the use of smart cards or certificates for authentication which makes implementation more challenging. SSTP is an excellent option as it leverages SSL/TLS to protect the MS-CHAPv2 authentication process. However, SSTP is only supported on Windows Vista SP1 and later clients. L2TP/IPsec is another good choice, and although it does support certificates it can also be configured using a pre-shared key. If long, complex passwords are used and care is taken to ensure that the password is well protected, it can provide a secure remote access solution.
Controlling Access to File Shares with Forefront TMG 2010
Consider a scenario in which you have an IIS server located in a perimeter network protected by Forefront TMG 2010. The server is published to the Internet and is used to display product information for your company. Web content developers on your internal network need to have access to file shares on the IIS server to upload new web content. To facilitate this access you create an access rule to allow CIFS access to the IIS server. For security reasons you decide to restrict access to members of the Web Content Developers domain group. In addition, your workstations have the Forefront TMG Firewall Client installed. The access rule looks like this:

When users attempt to map a drive to the file share on the web server they receive the following error message:
System error 67 has occurred.
The network name cannot be found.

In addition, the Forefront TMG 2010 firewall log indicates the following:
Denied Connection
Log Type: Firewall Service
Status: The action cannot be performed because the session is not authenticated.

At this point you might be puzzled because you have the Forefront TMG Firewall Client is installed on the workstation. TMG Firewall Client communication is always authenticated, so why does the firewall log indicate otherwise? The answer is simple. The Forefront TMG 2010 Firewall Client is a Layered Service Provider (LSP) that listens for Winsock calls made by the operating system and applications. Any Winsock calls made for resources on a remote network will be transparently delivered to the proxy server by the Firewall Client. However, CIFS communication does not use Winsock, so the TMG Firewall Client does not handle this traffic. As such, the network requests are delivered to the Forefront TMG firewall as SecureNAT requests. Since the rule in question requires authentication, and SecureNAT traffic cannot be authenticated, the firewall appropriately denies the traffic and the request fails.
You can resolve this issue by removing authentication on the access rule and controlling access on the file share itself. If you want to enforce user and group authentication at the firewall, consider using another protocol such as FTP.
For more information about the Forefront TMG 2010 Firewall Client and CIFS connections, please review Microsoft Knowledge Base article 913782.
New DirectAccess Blog
For anyone interested in news and information about Microsoft DirectAccess, I have started another blog at directaccess.richardhicks.com. With this blog I’ll be writing about DirectAccess in Windows Server 2008 R2, Forefront Unified Access Gateway (UAG) 2010 DirectAccess, and DirectAccess in Windows Server 2012. In addition, I’ll be touching on topics related to VPN and remote access in general, IPv6, and core networking. DirectAccess is the way of the future for managed client remote access, so I would encourage you to follow my blog and stay up to date with this wonderful technology. Of course I’ll still continue to write about edge security and Forefront TMG 2010 here, don’t worry!
Connect


