Archive
Configuring Forefront TMG for Microsoft System Center Data Protection Manager (DPM) 2010
Microsoft System Center Data Protection Manager (DPM) 2010 is a management product that provides data protection for Windows systems. More advanced than Windows Backup, DPM uses Protection Agents that provide advanced capabilities. Getting the DPM server to communicate with the Protection Agent installed on a Forefront TMG 2010 firewall can be challenging, however. DPM server-to-agent communication takes place over several non-standard ports, and it also relies on DCOM. Unfortunately the Forefront TMG RPC filter does not fully support DCOM , so we’ll need to employ a workaround to ensure that DPM communication works correctly.
[Note: Many resources that I found on the Internet detailing how to configure TMG for DPM were incorrect and didn’t work. Those that did work didn’t explain why, involved unnecessary steps, or included very broad rule sets that allowed more access to the TMG firewall than absolutely necessary. In this post I’ll provide a definitive and comprehensive guide to preparing the TMG firewall to work with DPM and its Protection Agent, while at the same time adhering to the principle of least privilege and maintaining the lowest possible attack surface.]
As stated, DPM uses Protection Agents installed on each system it manages and protects. This agent can be deployed remotely from the DPM console or installed manually and later ‘attached’. When installing the Protection Agent on a Forefront TMG 2010 firewall it is recommended that the agent be installed manually following the instructions here. Since there is no system policy access rule for DPM, we’ll need to configure access rules to allow the required communication to and from the Protection Agent on the TMG firewall and the DPM server. Begin by creating three new protocols as follows:
DPM Agent Coordinator – TCP 5718 outbound
DPM Protection Agent – TCP 5719 outbound
DPM Dynamic Ports – TCP 50000-50050 outbound
Create a Computer or a Computer Set network object that includes the IP address of your DPM server. DO NOT add the DPM server to the Enterprise Remote Management Computers or Remote Management Computers network objects.
Next, create an access rule called DPM [Inbound]. The action will be allow and the protocols will include the three new protocols you just created, along with Microsoft CIFS (TCP) and RPC (all interfaces). The source will be the DPM server and the destination will be Local Host for all users. Now right-click on the access rule and choose Configure RPC protocol.

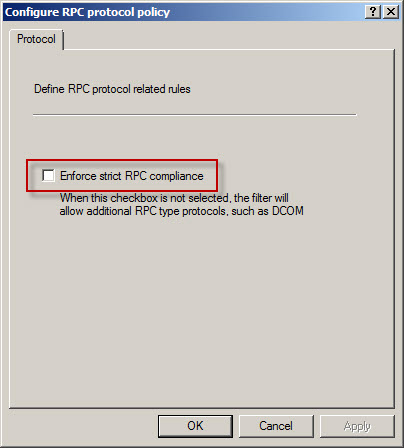
Uncheck the box next to Enforce strict RPC compliance and choose Ok.

Create another access rule called DPM [Outbound]. The action will be allow and the protocols will include only DPM Agent Coordinator [5718] and DPM Dynamic Ports [50000-50050]. The source will be Local Host and the destination will be the DPM server for all users. Once complete the rule set should look like this:
Next, right-click the Firewall Policy node in the TMG management console navigation tree and select All Tasks | System Policy | Edit System Policy. Under the Authentication Services configuration group highlight Active Directory. Select the General tab and uncheck the box next to Enforce strict RPC compliance.
The last step required to allow the DPM server to communicate with a Protection Agent installed on the TMG firewall involves making registry changes to restrict RPC communication to a specific range of ports. This is necessary because, as I mentioned earlier, the TMG RPC filter does not fully support DCOM and is unable to manage the dynamic port assignments required for this communication. This change must be made to both the TMG firewall and the DPM server. To make this change, open the registry editor on each system and navigate to the HKLM\Software\Microsoft\Rpc\Internet key.
Create the following new keys:
Ports – REG_MULTI_SZ, 50000-50050
PortsInternetAvailable – REG_SZ, Y
UseInternetPorts – REG_SZ, Y
You can download a .reg file and the TMG access policies here.
Note: For this limited demonstration I have chosen to restrict the dynamic port range to 50 ports. In a real production environment, you may need to increase this limit. An excellent reference article that includes a formula to determine the number of ports required can be found here.
Once the registry changes have been made, the system will have to be restarted for the changes to take effect. After both systems are back online, install the Protection Agent manually on the TMG firewall and then attach the agent in the DPM management console. You can now manage TMG firewall protection in DPM just as you would any other Windows system.
More about Determining TMG Version Numbers
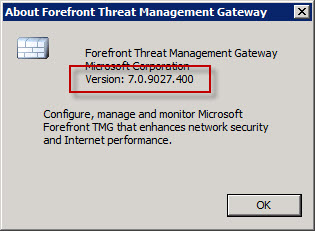
A common method for determining the version number for an instance of Forefront Threat Management Gateway (TMG) 2010 is to open the TMG management console and from the drop down menu select Help and About Forefront Threat Management Gateway…

Recently I discovered that this method may not be the most reliable way to determine the TMG version number. After installing Update 2 for TMG SP 1 (version number 7.0.9027.410) I noticed that the TMG management console was still reporting the build number from the previous update (7.0.9027.400 as shown above). However, using the script I demonstrated in a previous blog post the build number is reported correctly as 7.0.9027.410.
To verify the version number once more, I highlighted the System node in the navigation tree and clicked the Servers tab. Here the version number is again displayed correctly as 7.0.9027.410.

The moral of the story here is not to rely only on the Help | About Forefront Threat Management Gateway… drop down menu in the TMG management console to determine the version number. To accurately determine the TMG version, check the version number in the Servers tab of the System node in the TMG management console or use the COM script.
Installing TMG on Windows Server 2008 R2 Core
Sounds like a great idea, right? I agree! If you found this post hoping to learn how to install Microsoft Forefront Threat Management Gateway (TMG) 2010 on Windows Server core, then I apologize for misleading you. Sadly, the reality is that TMG cannot be installed on any version of Windows Server core. It would seem to be a natural choice as the underlying operating system for the TMG firewall since it has fewer installed services, which reduces patching requirements and minimizes the attack surface. Unfortunately TMG has dependencies on roles and features, namely the Network Policy Server (NPS) and the Routing and Remote Access Service (RRAS) that are not available on Windows Server core installations.
Personally I love Windows Server core. Since I began working with computers many years before Windows arrived on the scene, I’m more than comfortable at the command line. I use Windows Server core in my virtual labs for infrastructure services such as domain controllers, DNS servers, and even certificate services (which is not trivial to get working correctly!). Having Windows Server core as the supporting operating system for a TMG firewall would be wonderful, however, in my discussions with the TMG development team it appears that updating TMG to run on Windows Server core would be a difficult (if not impossible) task. Given that there has been little demand for TMG on Windows Server core, I don’t expect this to be a supported configuration any time soon. If future versions of Windows Server core include support for NPS and RRAS (and why not, it would be a great idea!) then perhaps we’ll see TMG supported on Windows Server core in the future.


