Archive
WPAD Considerations for Kerberos Authentication with NLB VIP on Forefront TMG 2010
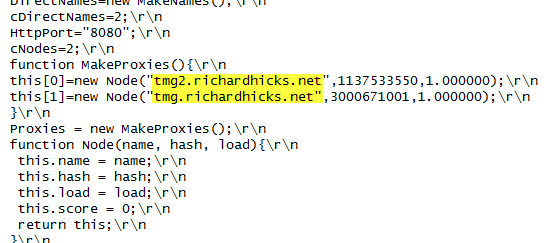
As I outlined in a recent article on ISAserver.org, Service Pack 2 (SP2) for Forefront TMG 2010 supports Kerberos authentication in load-balanced scenarios when web proxy clients are configured to use the virtual IP address (VIP) of the array. However, using Web Proxy Automatic Discovery (WPAD) with either DNS or DHCP poses a challenge for organizations that choose to take advantage of this new feature. When using WPAD, the web proxy client retrieves the automatic configuration script from the Forefront TMG firewall. The script provides the web proxy client with the IP addresses (or hostnames, if configured) of the individual array members. In this configuration, the web proxy client will send its request to one of the array members returned by function MakeProxies() and not to the VIP, as desired.

To work around this issue you can configure a separate web server to host the automatic configuration script. You can use any web server you wish, just make sure that it is highly available and don’t forget to configure the MIME type application/x-ns-proxy-autoconfig for the file extension you choose (typically .DAT or .PAC). Full details about how to do this can be found here. You can create your own Proxy Automatic Configuration (PAC) file from scratch, or you can simply retrieve the automatic configuration script from TMG, modify it to use the IP address (or preferably the hostname or FQDN) of the Forefront TMG array’s VIP, and place that on the web server for clients to retrieve. This means that the automatic configuration script will have to be updated manually, as required. This could be automated by writing a script that periodically retrieves the automatic configuration script from the Forefront TMG firewall, modifies it appropriately, and then saves it on the web server if you were really clever! Another alternative is to configure the Forefront TMG 2010 firewall to return a customized automatic configuration script. You can find details about this configuration here.
Installing Forefront TMG 2010 SP2 on Enterprise Arrays
July 4,2012 – Update: A script is now available on ISATools.org that will identify the exact order in which to install TMG SP2 for your environment. You can download the script here.
To successfully install Service Pack 2 (SP2) for Forefront TMG 2010, you must first install Service Pack 1 (SP1), then Software Update 1 for SP1 (SP1U1) as I indicated in a previous blog post. None of the other hotfix rollups available for Forefront TMG are required to upgrade to SP2. For Forefront TMG 2010 enterprise arrays, these updates must be installed in a specific order to eliminate potential conflicts. The proper sequence is as follows:
First, install SP1 for Forefront TMG 2010 on the…
- Enterprise Management Server (EMS)
- Reporting server in each array
- Remaining array members in each array
Next, install Software Update 1 for Forefront TMG 2010 SP1 on the…
- EMS
- Reporting server in each array
- Remaining array members in each array
Lastly, install SP2 for Forefront TMG 2010 on the…
- EMS
- Reporting server in each array
- Remaining array members in each array
For standalone arrays, treat the array manager as the EMS and follow the order outlined above. In addition, if you are adding a new array member to an existing array, install Forefront TMG 2010 and apply the updates in order before joining the array. Make certain that the new array member is at the same update level as the EMS and other array members. Also, consider slipstreaming SP2 with your installation media to save yourself some time.
Special thanks to Jim Harrison for clarification on the installation order.
Slipstream Service Pack 2 for Forefront TMG 2010
Now that Service Pack 2 (SP2) for Microsoft Forefront TMG 2010 is available I’ve had numerous people ask me about the process of slipstreaming the service pack with the Forefront TMG 2010 installation media. Having Forefront TMG 2010 with SP2 slipstreamed is a great time saver if you install TMG frequently like I do, but it is also essential if you wish to install Forefront TMG 2010 on a read-only domain controller (RODC). Last year when service pack 1 for Forefront TMG 2010 was released I wrote this post on how to slipstream the service pack. The process is nearly identical with Forefront TMG 2010 SP2 with the exception that there are a few more steps required because of TMG SP2’s dependencies on SP1 and software update 1 for TMG SP1.
To slipstream SP2 with the Forefront TMG 2010 installation media, begin by copying the contents of your Forefront TMG 2010 DVD or extracting the ISO to a temporary folder. Next, download Forefront TMG 2010 SP1, Forefront TMG 2010 SP1 software update 1, and Forefront TMG 2010 SP2. Software update 1 for Forefront TMG 2010 SP1 and SP2 for Forefront TMG 2010 are both .exe files that can’t be used for slipstreaming. To support slipstreaming we’ll need to extract the .msp files from them by opening an elevated command prompt and issuing the following commands:
For software update 1 for Forefront TMG 2010 SP1
TMG-KB2288910-amd64-ENU.exe /t d:\temp\SP1U1
For Forefront TMG 2010 SP2
TMG-KB2555840-amd64-ENU.exe /t d:\temp\SP2
Now begin the slipstreaming process by navigating to the \FPC folder of the TMG installation source and then issuing the following commands:
First, slipstream SP1 for Forefront TMG 2010
msiexec /a MS_FPC_Server.msi /p d:\temp\sp1\TMG-KB981324-AMD64-ENU.msp
Next, slipstream software update 1 for Forefront TMG 2010 SP1
msiexec /a MS_FPC_Server.msi /p d:\temp\sp1u1\TMG-KB2288910-amd64-ENU.msp
Finally, slipstream Forefront TMG 2010 SP2
msiexec /a MS_FPC_Server.msi /p d:\temp\sp2\TMG-KB2555840-amd64-ENU.msp
Once complete, use your favorite tool to burn a DVD or create an ISO file.
Important Note: If you install the Forefront TMG 2010 firewall client from the new SP2 slipstreamed installation source, you will still need to install the October 2011 Forefront TMG 2010 firewall client hotfix rollup as outlined in my previous blog post.


