Archive
IIS on ISA – The One Exception!
In a recent blog post, Yuri Diogenes cautions us that we should not be installing IIS on ISA. I couldn’t agree with him more! There is, however, one exception – when it is installed from the factory on a Celestix MSA or WSA Series security appliance. Celestix installs and configures IIS on our ISA and IAG appliances to support our web-based remote management console. Under no circumstances should the IIS services on our appliances be used to support any other content or application. This configuration is definitely not supported and our support engineers will not be able to assist you if you attempt to do so!
ISA 2006 with Integrated Websense and the /3GB Switch
The /3GB boot.ini switch is perhaps the most misunderstood Windows tuning parameter there is. If you are not familiar with this switch, enabling it allows user mode processes to address 3GB of virtual memory instead of the usual 2GB. It does this at the expense of valuable kernel memory, however. The ISA firewall relies heavily on kernel memory (fweng.sys is the heart of the firewall core and runs in kernel mode) and cutting it in half can dramatically affect stability and performance by reducing the amount of available Paged and Non-paged Pool memory and reducing the maximum number of System Page Table Entries (PTEs). It has been well documented that the use of the /3GB boot.ini switch can cause serious issues, and in fact the ISA Best Practices Analyzer complains when it finds this switch in use.
Applications must be configured to take advantage of this additional memory made available by the /3GB switch. You can verify which applications are configured in this manner by using the dumpbin.exe utility that is included with Microsoft Visual C++ and specifying the /HEADERS parameter. Websense has enabled this functionality for some of their core services, and by looking at the headers for eimserver.exe version 7.1.0.1154 we can see that this image does indeed support large address space.

Websense is now optionally recommending that the /3GB switch be enabled when applying certain hotfixes. If you have Websense components installed on the ISA firewall itself I would strongly dissuade you from enabling the /3GB switch. If you are experiencing memory related issues with Websense services on your ISA firewall, add additional RAM. If memory related issues persist, remove all Websense services other than the filtering plug-in and place them on a separate system outside of the ISA firewall. You can then safely enable the /3GB switch on that system.
Configuring Microsoft ISA Server 2006 Web Proxy to Prompt Authenticated Users
When the ISA firewall is configured as a forward proxy server, the web proxy listener is configured to use integrated authentication by default.
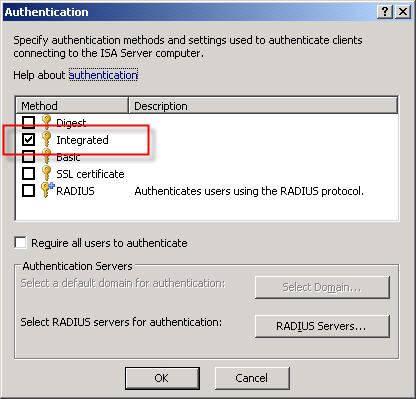
A web proxy client makes its initial request anonymously. If there are no policies allowing anonymous access to the requested destination, the ISA firewall responds with a challenge for authentication in the form of an HTTP 407 response (proxy authentication required).
The client then resubmits the request, this time providing credentials to the firewall. This transaction is completely transparent to the end user. The credentials supplied to the ISA firewall are that of the current logged on user. If the user does not have permission, the ISA firewall denies the request without prompting. This behavior is by design.
There are situations in which this behavior is not desirable. Recently I was working with a customer who had workstations configured to log on automatically with a non-privileged domain service account. These workstations were used to access a web-based application on the local intranet. There are times when privileged users will need access to the Internet from these systems, but they will need to do so without logging the service account off. To meet these requirements we needed to configure the ISA firewall to prompt authenticated users for credentials if they are initially denied access.
Making this change required setting the value of the ReturnAuthRequiredIfAuthUserDenied property of the web proxy listener to ‘true’. When configured, the ISA firewall will prompt authenticated users for credentials when they are denied access. This change cannot be made via the management console; it can only be configured programmatically. The MSDN reference for this property contains a VBScript that is used for changing this setting, or you can download the script here. Run the script from the command line on the ISA firewall with the argument ‘true’ to enable prompting for authenticated users who are denied access and ‘false’ to disable it.
For example…
ReturnAuthRequiredIfAuthUserDenied.vbs true
…enables the prompting of authenticated users who are denied access, and…
ReturnAuthRequiredIfAuthUserDenied.vbs false
…disables it.
Microsoft ISA Server 2006 Web-based Management Console?
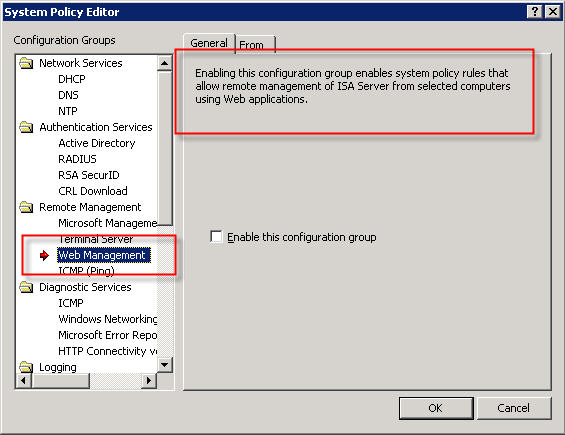
In response to my recent blog post about system policies in Microsoft ISA Server, several people asked me about a rule called ‘Web Management’…
The description of the rule states that “Enabling this configuration group enables system policy rules that allow remote management of ISA server from selected computers using Web applications”. This rule is disabled by default when you install the ISA firewall software. If you view the access rule itself, you will notice that the protocol defined is “ISA Server Web Management” and is configured to use TCP port 2175 outbound.
So, is there a native web-based management application for Microsoft ISA Server 2006? The answer is no; at least not natively. According to Jim Harrison, this system policy rule was implemented to provide OEM’s a way to enable remote web-based management of an ISA appliance. Embarrassingly enough, I work for Celestix Networks but didn’t know this. ; ) In my defense, however, the web-based management utility that ships with the Celestix MSA Series security appliance is configured to use port 10000. Since the ISA defined protocol was TCP port 2175, which coincidentally is near other native Microsoft ISA Server ports, it sure sounded plausible that maybe there was a native Microsoft ISA web-based management console (or perhaps there were plans for one at some point).
So there you have it. In spite of what the system policy rule might look like, there is no native Microsoft ISA Server web-based management console. If you would like the ability to manage ISA with a web browser, I would strongly encourage you to check out the Celestix MSA Series security appliance featuring Microsoft ISA Server 2006. Not only will you get an intuitive web-based management console, you’ll get plenty of other benefits as well.
Security Update for Microsoft ISA Server 2006 (MS09-031)
Microsoft today announced the availability of a security update for Microsoft ISA Server 2006. This update addresses a vulnerability with RADIUS One Time Password (OTP). This update is rated important, and affects only ISA Server 2006 (and only in very specific scenarios). Previous versions of ISA are not affected, nor is Forefront Threat Management Gateway. For additional information, please read this post from the ISA product team.
Reviewing the Microsoft ISA Server 2006 System Policy
By default, the Microsoft ISA Server firewall is configured to deny all traffic that is not explicitly permitted by an access rule. This means that the firewall administrator will need to configure a number of access rules in order to facilitate domain and client communication, among other things.
Thankfully the ISA firewall includes a set of system policy access rules that simplify the configuration and operation of the firewall. The system policy contains a set of pre-configured access rules that allow ISA and the underlying operating system to communicate with things such as domain controllers, DNS servers, authentication servers, etc. The system policy rules are hidden from view by default. If you wish to see the system policy rules themselves, right-click on the ‘Firewall Policy’ node, highlight ‘View’, and then select ‘Show System Policy Rules’.
To edit the system policy rules, right-click on the ‘Firewall Policy’ node and choose ‘Edit System Policy…’.
If you have chosen to display the system policy rules you can double-click any rule or right-click a rule and choose ‘Edit System Policy’ to bring up the system policy editor as well.
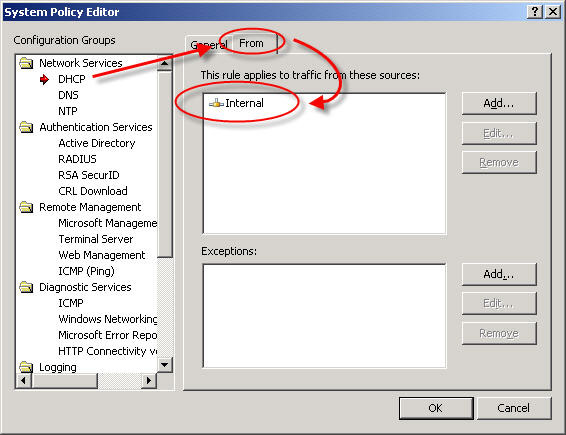
Although having pre-configured system policy rules is convenient, some of the rules are broad or may not be required in your environment. I would highly recommend that you review and edit the system policy prior to deploying a production Microsoft ISA firewall. For example, by default the system policy is configured to allow DHCP requests from the ISA firewall to the Internal network.
From a security perspective it would be best to specify which DHCP servers your ISA firewall can communicate with. Create new computer objects for each of your DHCP servers and specify them as the source for this rule instead of the entire Internal network. If none of your firewall’s network interfaces are configured to use DHCP you can safely disable this rule.
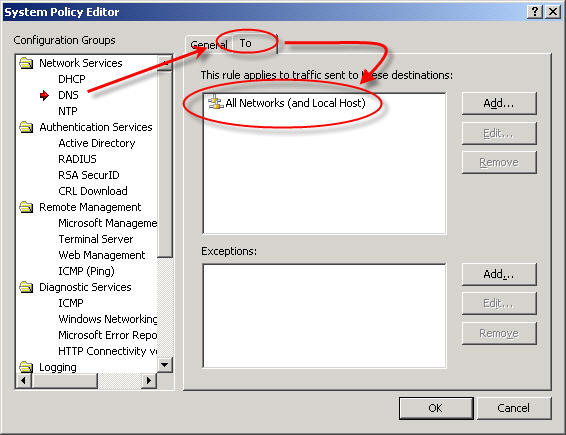
Another instance where the system policy can be tightened up is the DNS system policy rule. By default this rule allows the ISA firewall to communicate to DNS servers on all networks – and that includes the external network! (see Jason Jones’ blog post on proper ISA firewall network configuration)
This is an excellent opportunity to improve the security posture of your ISA firewall. I would recommend that you specify which DNS servers the ISA firewall can communicate with explicitly. Create new computer objects for each of your DNS servers and specify them as the destination for this rule, removing of course the ‘All Networks (and Local Host)’ network object.
One more example of broad system policy configuration is the SMTP system policy rule. By default this rule allows the ISA firewall to communicate to any SMTP server on the Internal network.
Again, your configuration will be much more secure if you specify which SMTP servers the ISA firewall can communicate with. If you are not using STMP notifications on the ISA firewall you can safely disable this rule.
These are only a few examples of areas where the system policy rule set can be tightened to improve security on the ISA firewall. Once you have completed your initial configuration, I would strongly encourage you to review and edit these policies. By disabling unnecessary rules and restricting the access on others you can enhance the already secure configuration of the ISA firewall.
Microsoft ISA Server 2006 Role Based Administration
Microsoft ISA Server 2006 features role based administration to provide granular access to the ISA firewall configuration and security policies. When configured properly, users who have local administrative rights on the underlying operating system do not implicitly have administrative privileges on the ISA firewall. The security model of the ISA firewall is such that administrative access is defined by the firewall administrator explicitly. However, during the process of installing ISA Server 2006, the BUILTIN\Administrators group, along with the account of the user installing the software is automatically added to the ‘ISA Server Full Administrator’ role. This is done for the obvious reason that someone has to be able to administer the firewall once it is installed!
While this default configuration is good for functionality, it is not particularly ideal for security. The domain administrators group is typically a member of the local administrators group on all domain-joined Windows systems (your ISA firewall should be a member of the domain!). However, do you want all of your domain administrators to have full control over your firewall? In small to mid-sized deployments, perhaps. In larger enterprise deployments, not likely. Now I realize that if you can’t trust your domain administrators you have a serious problem, but I also believe strongly in the principle of least privilege. I would much prefer to keep the number of firewall administrators to a bare minimum.
In my opinion, one of the first things an ISA firewall administrator should do is immediately remove the local administrators group and explicitly define the firewall administrators. In fact, I recommend defining your administrators by their individual user accounts as opposed to using local or domain groups. I prefer this method because it provides more control over who has ISA firewall administrative rights. If you decide to define your ISA firewall administrators by group, be sure to use restricted groups to prevent someone from intentionally or unintentionally adding unnecessary users to the ISA firewall administrators group.
A Few Notes Regarding Remote SQL Logging with Microsoft ISA Server 2006 and Forefront Threat Management Gateway
In response to my last blog post disucssing remote SQL logging for Microsoft ISA Server, several people asked about the data stored in the IP address fields of the ISA 2006 log database.
Clearly these are not IP addresses. In ISA versions up to and including ISA Server 2004, the data type for these fields were varchar(32) and contained IP addresses in the familiar dotted decimal notation.
Beginning with ISA Server 2006, the data type for these fields were changed to bigint. In order to convert the data from these fields to the more familiar dotted decimal notation, use the following SQL function (adapted from this KB article):
CREATE FUNCTION [dbo].[fnConvertIPToText] (
@ISALogIPAddress [bigint]
)
RETURNS varchar(15) AS
BEGIN
DECLARE @ConvertedAddress varchar(15)
SET @ConvertedAddress =
CAST(@ISALogIPAddress / 256 / 256 / 256 % 256 AS VARCHAR) + ‘.’ + CAST(@ISALogIPAddress / 256 / 256 % 256 AS VARCHAR) + ‘.’ + CAST(@ISALogIPAddress / 256 % 256 AS VARCHAR) + ‘.’ + CAST(@ISALogIPAddress % 256 AS VARCHAR)
RETURN @ConvertedAddress
END
[Download script here.]
(Special thanks to my good friend Christopher Schau, DBA extraordinaire, for creating this function for me!)
When selecting data from the table, use the function created above to convert the data follows:
SELECT
LogTime,
dbo.fnConvertIPToText(SourceIP) AS [SourceIP],
dbo.fnConvertIPToText(DestinationIP) AS [DestinationIP],
dbo.fnConvertIPToText(OriginalClientIP) AS [OriginalClientIP]
FROM
firewalllog
Data from the IP address fields returned from this query will now appear in the familiar dotted decimal notation.
Looking ahead to Microsoft Forefront Threat Management Gateway (TMG), the developers have once again changed the data type for IP address fields. In TMG, the data type for these fields were changed to uniqueidentifier. This was done in order to support IPv6 entries in these fields. In order to convert the data from these fields in to the more familiar dotted decimal notation, use the following SQL function:
CREATE FUNCTION [dbo].[fnIpAddressToText]
(
@Ipv6Address [uniqueidentifier]
)
RETURNS varchar(40) AS
BEGIN
DECLARE @strInAddress varchar(40)
DECLARE @strOutAddress varchar(40)
SET @strInAddress = LOWER(CONVERT(varchar(40), @Ipv6Address))
SET @strOutAddress = ”
IF (SUBSTRING(@strInAddress, 10, 4) = ‘ffff’)
BEGIN
— ipv4 (hex to int conversion)
DECLARE @IsNum int, @ZERO int, @IsAlpa int
set @ZERO = ASCII(‘0’)
set @IsNum = ASCII(‘9’)
set @IsAlpa = ASCII(‘a’) – 10
DECLARE @intH int, @intL int
SET @intH = ASCII(SUBSTRING(@strInAddress, 1, 1))
IF (@intH <= @IsNum) SET @intH = @intH – @ZERO ELSE SET @intH = @intH – @IsAlpa
SET @intL = ASCII(SUBSTRING(@strInAddress, 2, 1))
IF (@intL <= @IsNum) SET @intL = @intL – @ZERO ELSE SET @intL = @intL – @IsAlpa
SET @strOutAddress = CONVERT(varchar(3), @intH * 16 + @intL) + '.'
SET @intH = ASCII(SUBSTRING(@strInAddress, 3, 1))
IF (@intH <= @IsNum) SET @intH = @intH – @ZERO ELSE SET @intH = @intH – @IsAlpa
SET @intL = ASCII(SUBSTRING(@strInAddress, 4, 1))
IF (@intL <= @IsNum) SET @intL = @intL – @ZERO ELSE SET @intL = @intL – @IsAlpa
SET @strOutAddress = @strOutAddress + CONVERT(varchar(3), @intH * 16 + @intL) + '.'
SET @intH = ASCII(SUBSTRING(@strInAddress, 5, 1))
IF (@intH <= @IsNum) SET @intH = @intH – @ZERO ELSE SET @intH = @intH – @IsAlpa
SET @intL = ASCII(SUBSTRING(@strInAddress, 6, 1))
IF (@intL <= @IsNum) SET @intL = @intL – @ZERO ELSE SET @intL = @intL – @IsAlpa
SET @strOutAddress = @strOutAddress + CONVERT(varchar(3), @intH * 16 + @intL) + '.'
SET @intH = ASCII(SUBSTRING(@strInAddress, 7, 1))
IF (@intH <= @IsNum) SET @intH = @intH – @ZERO ELSE SET @intH = @intH – @IsAlpa
SET @intL = ASCII(SUBSTRING(@strInAddress, 8, 1))
IF (@intL <= @IsNum) SET @intL = @intL – @ZERO ELSE SET @intL = @intL – @IsAlpa
SET @strOutAddress = @strOutAddress + CONVERT(varchar(3), @intH * 16 + @intL)
END
ELSE
BEGIN
— ipv6
SET @strOutAddress = @strOutAddress + SUBSTRING(@strInAddress, 1, 4) + ':'
+ SUBSTRING(@strInAddress, 5, 4) + ':'
+ SUBSTRING(@strInAddress, 10, 4) + ':'
+ SUBSTRING(@strInAddress, 15, 4) + ':'
+ SUBSTRING(@strInAddress, 20, 4) + ':'
+ SUBSTRING(@strInAddress, 25, 4) + ':'
+ SUBSTRING(@strInAddress, 29, 4) + ':'
+ SUBSTRING(@strInAddress, 33, 4)
END
—- guid sample '6F9619FF-8B86-D011-B42D-FFF34FC964FF'
RETURN @strOutAddress
END
[Download script here.]
(Special thanks to Avi Sander with Microsoft Israel for sharing this SQL code with me. Shortly after I received this code it was also posted on the TMG Product Team Blog as well.)
I apologize in advance if any of the SQL code listed in this post is not readable. When posting code like this, formatting with WordPress can cause problems. If you have any issue with code on this page, send me an e-mail and I’ll be glad to send you the actual script files.
Remote SQL Logging with Microsoft ISA Server 2006
Recently I had the opportunity to assist one of my customers with configuring their ISA firewalls to log to a central, remote SQL server. As it turns out, configuring remote SQL logging was not as simple and straightforward as I had anticipated, so I decided to document the process here for reference.
I’ll start out by saying that I’m not particularly a big fan of remote SQL logging for ISA because there are some serious risks involved in doing so. Remote SQL logging brings added complexity and introduces additional moving parts and potential single points of failure. By default, the ISA firewall will shut down if it is unable to write to the log, which means that if the SQL database is unavailable for any reason (offline for maintenance, out of disk space, network communication failure, etc.) the firewall service will go into lockdown mode and it will stop servicing requests (there is a workaround for this, but since it is something that I strongly discourage, I have chosen not to document that here. Also, Forefront Threat Management Gateway includes new functionality that addresses this specific issue – see below). It also requires (obviously) that you purchase an SQL license and have another server to install the software on (NEVER install SQL on the ISA firewall itself!).
Of course if you take steps to mitigate some of these concerns, there are some advantages to remote SQL logging for ISA. It certainly is much more robust that MSDE, and using an SQL database for logging allows you to access historical data from the ISA management console as well (this requires that you install the advanced logging components, even though you will not be using the local MSDE database). There are some advantages to having all of the ISA firewalls in your enterprise log to a central location, and of course you can also leverage any existing SQL reporting tools that you may already have and be familiar with, too. Ultimately the decision to use remote SQL logging for ISA is up to you. Before making that decision I would strongly encourage you to review the Best Practices for Logging in ISA Server 2004/2006 document on TechNet. If you decide to use remote SQL logging, the best advice I can give you is to ensure you have abundant, highly reliable network bandwidth between your ISA firewalls and your SQL server. In very busy network environments it might even be desirable to dedicate a separate network interface solely for SQL communication in order to accomplish this.
Configuring the Database Server
Before we configure the ISA firewall for remote SQL logging, the first thing that we need to do is configure the database on the SQL server (I am going to make the assumption that the reader has some familiarity with SQL, as detailed SQL configuration is beyond the scope of this article).
To create a database, open Microsoft SQL Server Management Studio, then click on ‘New Query’. In the new query window, execute the following commands:
create database [isalogs]
go
use [isalogs]
go
This is a very simplistic way to create a database, of course. Ideally you (or your DBA) would follow SQL best practices and place the data and log files on separate partitions, configure database sizes, specify autogrowth options, and whatever else a ‘real’ DBA would do (that’s not me, for sure!).
Next, locate the two SQL scripts that will be used to create the required tables for ISA logging. The two script files are ‘fwsrv.sql’ and ‘w3proxy.sql’ and they are located in the \Program Files\Microsoft ISA Server folder on the ISA firewall itself, or on the ISA installation CD in the \FPC\Program Files\Microsoft ISA Server folder. Copy these scripts to a location that is accessible from the SQL server, then in the ‘Microsoft SQL Server Management Studio’ window, choose ‘File | Open | File’ (or just Ctrl-O) and select each script. Once the script appears in the query window, execute the script by pressing ‘F5’ and then close the window.
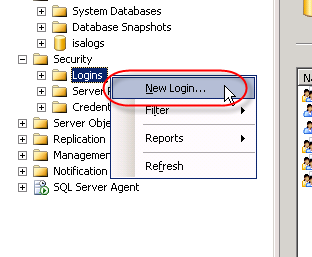
To continue we’ll need to create a SQL login for the new database. In the Microsoft SQL Server Management Studio console window, expand the ‘Security’ node in the ‘Object Explorer’ in the left pane, then right-click ‘Logins’ and choose ‘New login’.
Best practices dictate that Windows authentication should be used for optimum security, so enter the name of the ISA firewall in the ‘Login name’ box as domain\computername$. For the ‘Default database’ select ‘isalogs’.
Select ‘User Mapping’, then select the checkbox next to the ‘isalogs’ database. Choose the ‘db_datareader’ and ‘db_datawriter’ database roles (‘public’ is checked by default) and then choose ‘Ok’.
Repeat this process for each ISA firewall that will be logging to this database.
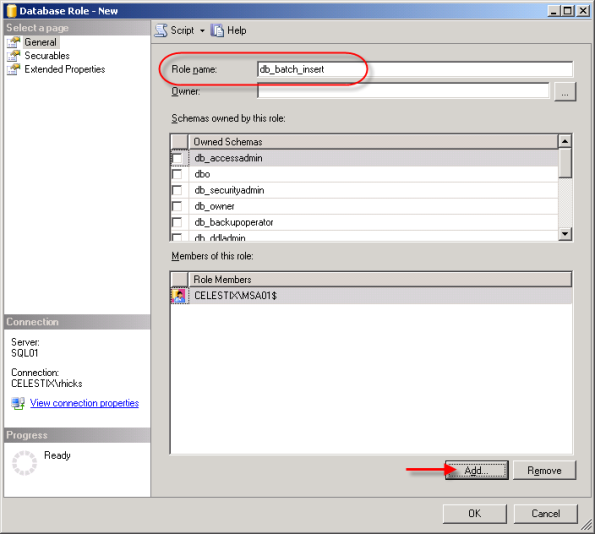
Now that we’ve created the login, we need to grant some additional privileges in order for the ISA firewall to successfully log data to the database. First we’ll begin by creating a new database role for our database. In the ‘Object Explorer’, expand the ‘isalogs’ database, then expand ‘Security’ and then ‘Roles’. Right-click on ‘Database Role’ and choose ‘New Database Role’.
Call the new role name ‘db_batch_insert’, then add each of the ISA firewall logins you created earlier. Choose ‘Ok’ twice to complete.
Once the database role has been configured, open a new query window in the Microsoft SQL Server Management Studio console and execute the following command:
use [isalogs]
go
grant execute on [dbo].[sp_batch_insert] to [db_batch_insert]
go
If you are performing these steps on a Forefront Threat Management Gateway system, you will need to also execute the additional following command:
use [isalogs]
go
grant execute on [dbo].[sp_batch_discard] to [db_batch_insert]
go
Note: If you have only a single ISA firewall, you can skip the above steps creating a new database role and simply grant execute access for the ISA firewall directly to the stored procedure itself by executing the following command:
use [isalogs]
go
grant execute on [dbo].[sp_batch_insert] to [domain\computername$]
go
That’s it for the database configuration! Now let’s move on to the ISA firewall configuration.
Configuring the ISA Firewall
To allow for remote SQL logging, two specific system policy rules need to be enabled. In the ISA management console, right-click on ‘Firewall Policy’ and choose ‘Edit System Policy’. In the left pane of the System Policy Editor, under the ‘Logging’ configuration group, highlight the ‘Remote Logging (NetBIOS)’ policy and select the option to enable the configuration group. Next click on the ‘To’ tab. You’ll notice that the rule applies to traffic sent to the Internal network. While this works, I prefer to follow the principle of least privilege wherever possible, so I would suggest that you restrict this policy to only your authorized SQL servers.
Repeat these steps for the ‘Remote Logging (SQL)’ system policy, choose ‘Ok’, then apply the changes.
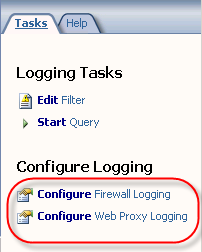
Next, in the ISA Management console, expand your array and then highlight the ‘monitoring’ node. Click on the ‘Logging’ tab, then in the right hand pane under ‘Tasks’ choose ‘Configure Firewall Logging’.
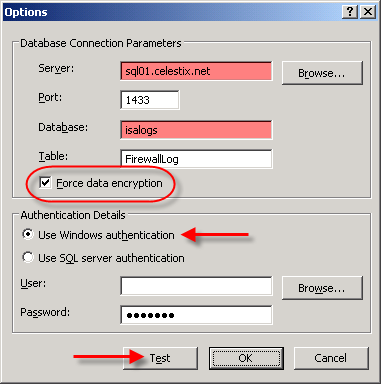
Select the ‘SQL Database’ option, then click on ‘Options’. Enter the FQDN for the database server, then enter the name of the database you created earlier. Since ISA firewall logging data is potentially sensitive, it is highly recommended that you select the option to ‘Force data encryption’. This will require that a valid server certificate be installed on your SQL server, however (for more information on how to configure SQL to use SSL, please read How to enable SSL encryption for an instance of SQL Server). Click on the ‘Test’ button and if everything is configured correctly, you should receive a message stating that the connection succeeded.
Once the test has been completed successfully, choose ‘Ok’, then click on the ‘Fields’ tab. At the bottom of the window, choose the option to ‘Select All’. This will ensure that all logging fields are recorded in the SQL database.
When finished, repeat these steps to configure web proxy logging, then apply the configuration changes to complete the process.
That’s it! You should now be logging data to your remote SQL server. To verify operation, open a new query window in the Microsoft SQL Server Management Studio console and enter the following commands:
use [isalogs]
go
select * from [firewalllog]
go
select * from [webproxylog]
go
If everything is working correctly you should now see data populated in both of these tables (for an explanation of why the IP address field does not return data in the familiar dotted decimal notation, see this blog post) . It takes a minute or two before the ISA firewall begins to populate the database with data, so be patient. : )
One last note in regard to remote SQL logging; if you choose not to install the ISA advanced logging components, you can still log to a remote SQL server. You will not, however, be able to view historical data in the ISA management console. This was something that I discovered when I configured my lab for documentation purposes. If you want to conserve resources and reduce the attack surface on the ISA firewall (an excellent idea!), I recommend removing (or not installing) the ISA advanced logging components. Keep in mind that to view historical data you will need to query your SQL server directly.
A Note about Logging with Forefront Threat Management Gateway
At the beginning of this post I had indicated that there are some potential issues with SQL logging for the ISA firewall. The good news is that there have been some significant improvements in the area of logging in Forefront Threat Management Gateway. First, TMG now uses SQL 2005 Express instead of MSDE, which is wonderful. Second, and very important for those of you considering remote SQL logging, TMG now has the capability to queue log data on the firewall itself.
This means that in very busy environments with high utilization, the likelihood of a logging failure (and subsequent firewall shutdown) due to the inability to write to the logs in a timely manner is greatly reduced. The TMG firewall can now queue logging requests during periods of high utilization, then write them out to the log later when more resources are available. Another benefit to this queuing is that when you are using a remote SQL server, the TMG firewall can continue to log and service requests even if the remote SQL server is offline for some reason. The TMG firewall will simply spool any queued log data out to the remote SQL server once it is back online. Great stuff!
Update for Microsoft ISA Server 2006 Standard with MS09-012
As many of you know, Microsoft security update MS09-012 can cause issues when installed on a Microsoft ISA firewall. These issues are related specifically to ISA 2004 and 2006 Standard Edition only, and only when it is installed on a system that has more than four processor cores. A workaround was originally posted by Jim Harrison on the ISA Product Team blog soon after the update was released. According to Jim, an update to address this issue is now available for ISA Server 2006. The update for ISA Server 2004 is still in the works. If you originally employed this workaround you are encouraged to install this new update.


